Some months ago, I became concerned that my trusty old Canon Vixia tape-based videocamera might be getting to the end of its lifespan. Replacing the camera actually meant replacing my entire video streaming setup, because there’s been a generational change in most of the components. I eventually ended up with this new kit:
Equipment Needed
- MacBook Pro with Thunderbolt connector – not the latest model, but with plenty of horsepower for video processing.
- Wirecast software. The UStream Producer Pro software I had been using is a customized version of Wirecast, with fewer options. This makes it easier if you’re only going to use it with the UStream streaming service, but the full version of Wirecast offers many more possibilities. Documented below is only the minimum I needed to figure out to do my usual streaming.
- UltraStudio Mini Recorder
- Thunderbolt cable
- HDMI cable
- Videocamera with HDMI output – which is almost any consumer-grade videocamera made today. I got a recent Canon Vixia ($250) which records only to SD cards (32 GB = about 4 hours).
- This setup assumes that you already have a UStream account with one or more channels you’ve created.
Warning: The set of steps below may be incomplete; I have not had much occasion to actually use this setup in production yet. In particular, you may have to do some fiddling to get the UltraStudio Mini Recorder recognized as an input device by your laptop.
Hardware Setup
- Put camera on tripod.
- Attach camera to power.
- Attach HDMI cable to the camera’s HDMI port, attach the other end to the HDMI port on the UltraStudio Mini Recorder.
- Attach the UltraStudio Mini Recorder to the laptop using the Thunderbolt cable.
- Ensure that the camera is set to record in HD.
Setting Up Camera Input
- Open Wirecast.
- Go to Sources | Show Sources Settings.
- Set as shown here – select the UltraStudio Mini Recorder:
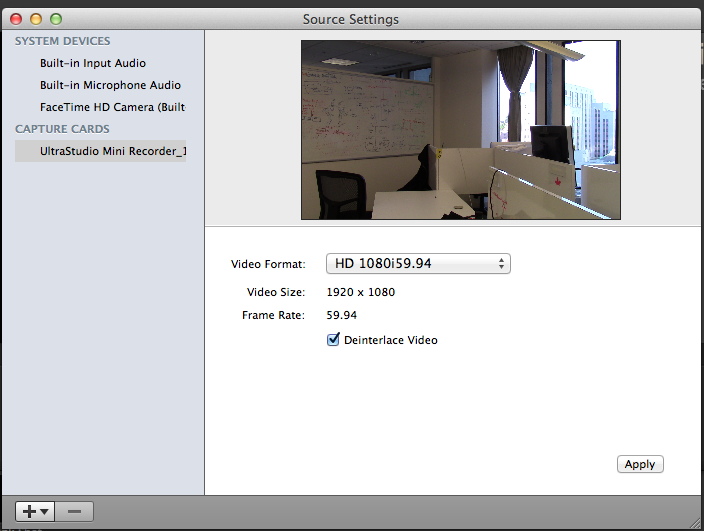
- Click Apply, and then the red button to close the dialog.
- In the shots area below the monitor area in Wirestream, hover over the + button next to a Blank Shot:

until you see icons: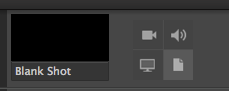
- Click on the camera icon (upper left) to get this menu:
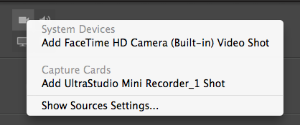
- Select Add UltraStudio Mini Recorder… You should now see the camera’s view in the new shot:
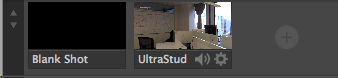
- Select the new shot to display it in the monitoring window.
Setting Up Output
- In Wirecast, select Output | Output Settings…
- In Select an Output Destination, choose UStream from the menu, click OK.
- In the Output Settings dialog, enter your UStream username into the Username box and click Authenticate.
- Enter the password as requested in the next dialog box. You should then see a list of channels available on your UStream account.
- Select the channel you want to broadcast on.
- In the same dialog box, select Add in the lower left.
- This will again open the Select an Output Destination dialog. This time choose Record to Disk – MP4 from the menu, and click OK – this way you’ll be recording to your local hard disk (as well as the camera’s SD card, if you remember to press the record button on the camera!) while also streaming.
- Click OK again to return to the main Wirecast window.
- NOTE: You are not actually streaming or recording anything yet, at this point you have only told Wirecast where you will want to stream and record to!
Streaming and Recording
To start streaming and recording (yes, you should do both!) go to the Output menu and select Start / Stop Broadcasting | Start All, then Start / Stop Recording | Start All.
Broadcasting to a Google Hangout
(Just because I figured out how. Not sure I’ll actually use this for anything; it only allows 9 people to join a broadcast.

- In Wirecast, set as shown above.
- Select Start.
- Start a Google Video Hangout.
- In the video window, select the Settings icon at the top of the screen.
- In the Settings dialog, select Wirecast Virtual Camera as shown:
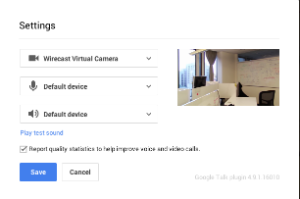
- Note that the image you see in your Hangout will be mirrored (yeah, whatever Google), but others in the hangout will see it the right way round, ie text will not be reversed!